UIScrollView CRUD
UIScrollView
UIScrollView is a great technology that has led to many other controls that have built on top of it, such as UITableView, UICollectionView, and UITextView. If any of the higher level controls can easily solve your problem go with those, but sometimes you need something more custom and UIScrollView is great at allowing you to create scrollable content.
If you want to play along, the full source code to this example is found in the CRUD section below.
Create
Should I use auto layout?
It depends. Usually, with UIScrollView I use auto layout for static content that does not get created or changed on the fly. Usually when you are displaying scrollable content, you have content you want to be created dynamically. Dynamic content works great programmatically since you won't be constrained to auto layout constraints and frame-based content size calculation will generally be less complex than trying to re-arrange auto layout constraints. If you know what the content will always be and look like then auto layout constraints work great without having to do a bunch of frame math.
Create UIScrollView programmatically
Make UIScrollView a property of your view controller so you can reference it in multiple places.
var scrollView : UIScrollView!
Your view controller's viewDidLoad method is a great place to initialize a UIScrollView object. Notice in the code below we are not setting the frame of the scrollview yet because the bounds of the view controller's view are not correctly set yet at this point. In viewDidLoad:
scrollView = UIScrollView()
scrollView.delegate = self
scrollView.contentSize = CGSizeMake(2000, 2000)
view.addSubview(scrollView)
Use a container view
Its best practice to put all elements that will go into the scrollview into a containing view. So the container will be a subview of UIScrollView and all other elements will be nested underneath the container view. This is a good design decision because if we were to implement zooming we are required to give a single view as the zooming view. To get all elements to zoom we'd need a container.
var containerView : UIView!
Now viewDidLoad looks like this:
override func viewDidLoad() {
    super.viewDidLoad()
    scrollView = UIScrollView()
    scrollView.delegate = self
    scrollView.contentSize = CGSizeMake(2000, 2000)

    containerView = UIView()

    scrollView.addSubview(containerView)
    view.addSubview(scrollView)
}
Set its frame
Since the bounds of the view controller's view is not ready in viewDidLoad, I like to do frame setting in viewDidLayoutSubviews which is guaranteed to not break on rotation. Since we are basing the containerView's frame on the scrollView's contentSize we could have moved the last line of code into viewDidLoad but anything that will be calculated based off the view's bounds directly or indirectly must not be put in viewDidLoad.
override func viewDidLayoutSubviews() {
    super.viewDidLayoutSubviews()

    scrollView.frame = view.bounds
    containerView.frame = CGRectMake(0, 0, scrollView.contentSize.width, scrollView.contentSize.height)
}
Other attributes
I usually set attributes on the scrollView in viewDidLoad. Since we will be zooming we set the minimum and maximum zoom scale factors. We will not be turning off bouncing in the CRUD example later in this article. I just wanted to show how to do it. While the bouncing feel does look cool when you scroll to the beginning or end of the scrollview it also doesn't fit with every context. I'm currently working on a simple grid game using UIScrollView and I found that bouncing takes away from the game-feel. Yes, animations are cool in games but sometimes the default built-in animations don't feel game-like. So I set the bounces property to false. Note that it defaults to true so you don't need to set that property if you do want it to bounce.
scrollView.minimumZoomScale = 0.5
scrollView.maximumZoomScale = 2.0
scrollView.bounces = false
Read
With UIScrollView the read part is the hardest. To be able to see what is happening to the scrollview we need to conform to the UIScrollViewDelegate protocol, set the view controller as the delegate, and implement the scrollview delegate callback methods. Notice there are quite a few and you must take all the relevant ones into consideration or your going to see some strange bugs. The way I like to approach this is encapsulating the read code into a single method that introspects the UIScrollView object and updates as necessary based on its state. Each relevant callback will call this method. Here are some useful properties to check for:
scrollView.zooming
scrollView.dragging
scrollView.contentOffset.x
scrollView.contentOffset.y
Notice I am using these properties in the read function of the CRUD example later in this tutorial to figure out whether it is stopped, panning, zooming, or both.
Update
Update sounds like a weird term for a user interface control. Update makes perfect sense for a table in a database. So what are some of the things we can do to update or change the scrollView? For one we can update the zoomScale property to zoom in or out. Also, we can update the contentOffset property to scroll to a particular location. Another thing we can do to change the scrollView is to add a subview to our container.
containerView.addSubview(myView)
Sometimes I like to combine the zoom and offset updates into a single method:
func update(zoomScale: CGFloat, offSet: CGPoint) {
    scrollView.zoomScale = zoomScale
    scrollView.contentOffset = offSet
}
Delete
Deleting from a scrollView would mean simply removing elements from the container. If you wanted to no longer show the scrollView itself you could do scrollView.removeFromSuperView() or set its hidden property to true. In the example below we will add views by tapping on the screen and then delete views by tapping on those views. We use the view.tag property to easily later identify these views with containerView.viewWithTag(myView.tag)
CRUD
The following example is meant to be copied and pasted over the ViewController.swift file in a new Single View Application. Just create a new Single View project in Swift and replace the entire contents of ViewController with the following:
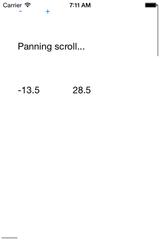
import UIKit

class ViewController : UIViewController, UIScrollViewDelegate, UITextFieldDelegate {

    var scrollView : UIScrollView!

    /*
     * As a subview to the Scroll View it will be repositioned as the user pans
     * Also is the view used for zooming
     */
    var containerView : UIView!

    var plusButton : UIButton!
    var minusButton : UIButton!
    var statusLabel : UILabel!
    var xField : UITextField!
    var yField : UITextField!

    var viewCount = 1

    // UIViewController

    override func viewDidLoad() {
        super.viewDidLoad()
        create()
        read()
    }

    override func viewDidLayoutSubviews() {
        super.viewDidLayoutSubviews()

        scrollView.frame = view.bounds
        containerView.frame = CGRectMake(0, 0, scrollView.contentSize.width, scrollView.contentSize.height)
        minusButton.frame = CGRectMake(0, 20, 50, 50)
        plusButton.frame = CGRectMake(50, 20, 50, 50)
        statusLabel.frame = CGRectMake(20, 70, 300, 80)
        xField.frame = CGRectMake(20, 150, 100, 80)
        yField.frame = CGRectMake(120, 150, 100, 80)
    }

    /******************************
     * CRUD
     * Create, Read, Update, Delete
     *****************************/

    // Create

    func create() {

        scrollView = UIScrollView()
        scrollView.delegate = self
        scrollView.minimumZoomScale = 0.5
        scrollView.maximumZoomScale = 2.0
        scrollView.contentSize = CGSizeMake(2000, 2000)

        containerView = UIView()

        containerView.addGestureRecognizer(UITapGestureRecognizer(target: self, action: "viewTapped:"))

        buildControls()

        scrollView.addSubview(containerView)

        view.addSubview(scrollView)

    }

    // Read

    func read() {
        var text = ""
        if scrollView.dragging {
            text = "Panning scroll... "
        }
        if scrollView.zooming {
            text += "Pinch zoom... "
        }
        if (!scrollView.zooming && !scrollView.dragging)
        {
            text += "Idle"
        }
        statusLabel.text = text
        xField.text = "\(scrollView.contentOffset.x)"
        yField.text = "\(scrollView.contentOffset.y)"
    }

    // Update

    func update(zoomScale: CGFloat, offSet: CGPoint) {
        scrollView.zoomScale = zoomScale
        scrollView.contentOffset = offSet
    }

    func addView(view: UIView, tag: Int) {
        view.tag = tag
        containerView.addSubview(view)
    }

    // Delete

    func deleteView(tag: Int) {
        containerView.viewWithTag(tag)?.removeFromSuperview()
    }


    // Controls

    func plus(sender : UIButton) {
        update(scrollView.zoomScale+0.1, offSet: CGPointZero)
    }
    func minus(sender : UIButton) {
        update(scrollView.zoomScale-0.1, offSet: CGPointZero)
    }

    func buildControls() {

        minusButton = UIButton.buttonWithType(.System) as UIButton
        minusButton.setTitle("-", forState: .Normal)
        minusButton.addTarget(self, action: "minus:", forControlEvents: .TouchUpInside)

        plusButton = UIButton.buttonWithType(.System) as UIButton
        plusButton.setTitle("+", forState: .Normal)
        plusButton.addTarget(self, action: "plus:", forControlEvents: .TouchUpInside)

        xField = UITextField()
        xField.placeholder = "x"
        xField.delegate = self
        yField = UITextField()
        yField.placeholder = "y"
        yField.delegate = self

        statusLabel = UILabel()

        containerView.addSubview(plusButton)
        containerView.addSubview(minusButton)
        containerView.addSubview(statusLabel)
        containerView.addSubview(xField)
        containerView.addSubview(yField)
    }

    func viewTapped(gesture : UITapGestureRecognizer) {
        if gesture.view == containerView {
            var v = UIView(frame: CGRectMake(0, 0, 100, 100))
            v.center = gesture.locationInView(containerView)
            v.backgroundColor = UIColor.redColor()
            v.addGestureRecognizer(UITapGestureRecognizer(target: self, action: "viewTapped:"))
            addView(v, tag: viewCount)
            viewCount = viewCount + 1
        } else {
            deleteView(gesture.view!.tag)
        }
    }


    // UIScrollViewDelegate

    func scrollViewWillBeginZooming(scrollView: UIScrollView, withView view: UIView!) {
        read()
    }
    func scrollViewDidZoom(scrollView: UIScrollView) {
        read()
    }
    func scrollViewDidEndZooming(scrollView: UIScrollView, withView view: UIView!, atScale scale: CGFloat) {
        read()
    }
    func scrollViewDidEndDecelerating(scrollView: UIScrollView) {
        read()
    }
    func scrollViewDidEndDragging(scrollView: UIScrollView, willDecelerate decelerate: Bool) {
        read()
    }
    func scrollViewWillBeginDragging(scrollView: UIScrollView) {
        read()
    }
    func scrollViewDidScroll(scrollView: UIScrollView) {
        read()
    }
    func viewForZoomingInScrollView(scrollView: UIScrollView) -> UIView? {
        return containerView
    }

    // UITextFieldDelegate

    func textFieldShouldReturn(textField: UITextField) -> Bool {
        let offset = CGPointMake(CGFloat((xField.text as NSString).floatValue), (CGFloat((yField.text as NSString).floatValue)))
        update(scrollView.zoomScale, offSet: offset)
        return true
    }
}
More CRUD
I like learning UIKit controls by figuring out the Create, Read, Update, Delete functionalities. So stay tuned for more articles like this one. Also, check out my UIToolbar CRUD article. Thanks!